Setting up a Discord server is an easy way for users to bring all their friends into one place.
Making your own Discord server is almost easier than downloading Discord. Once users have created or logged in to their Discord account, all it takes to make a personal server are a few simple clicks.
Creating a Discord server
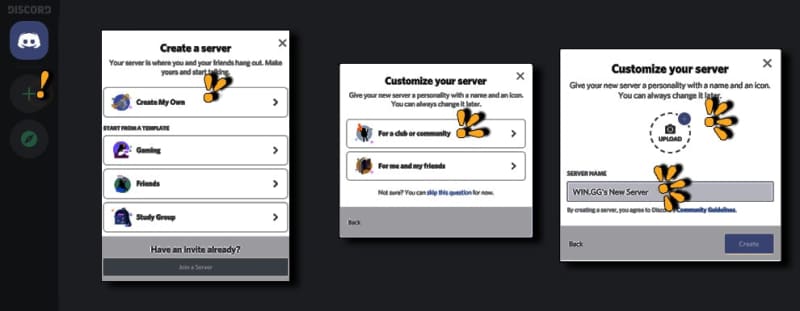
First, click on the plus icon on the left-hand side of the Discord client. A screen will appear and allow users to name their server, choose a premade layout if they choose to, and add a server icon. There are several kinds of layouts that users can choose from, but we’ve decided to start without one to show the program’s features. For the icon, Discord recommends an image that is 512x512 pixels in size.
If users aren’t sure what icon they want just yet, they can add or change the image whenever they wish. Clicking the “Create” button on the final screen will bring the user into their new server.
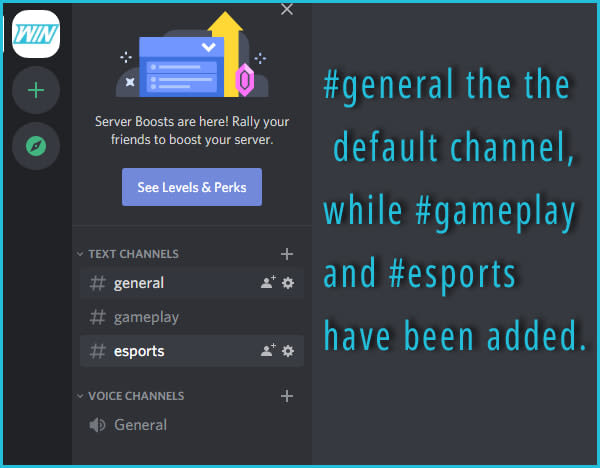
Each new server automatically starts with two categories; a default chat category named “Text Channels'' and one voice section named “Voice Channels.” Inside each of these categories, Discord has already added a single channel.
How to add new text and voice channels to Discord
Each new server automatically starts with two categories: a default chat category named “Text Channels'' and one voice section named “Voice Channels.” Inside each of these categories, Discord has already added a single channel.
Keeping things organized in Discord is both important and easy. For example, it’s smart to separate discussions about a game’s esports tournaments away from discussions about casual gameplay. To do this, users can create new text channels that can be used to help narrow down the content.
Let’s create two more text channels and two more voice channels named “gameplay” and “esports” so members can talk about those topics without cluttering other chat rooms. In the end, users will have a server that looks like this.
Click on the plus sign next to “Text Channels,” select “Text Channel” as the channel type, and name the channel “gameplay.” Note that channel names must be in lowercase, and any spaces are turned into hyphens. This is so that users can mention channels by using “#channelname."
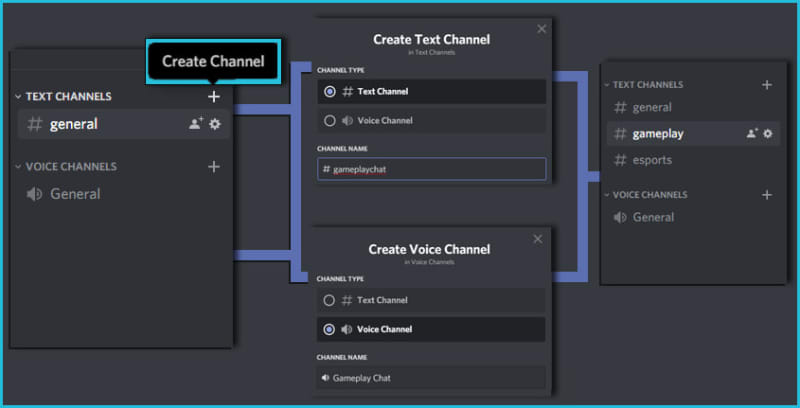
Leave the privacy option unchecked for now and then click “Create Channel." If it looks like the image above, do the same thing for a second text channel, naming it “esports.” Repeat the process to create two other voice channels named “esports” and “gameplay.” Unlike text channels, Discord’s voice channels can have spaces and capital letters.
Here’s how to create categories in Discord
The server now has new voice and text channels to keep things from getting messy, but there are more things that server owners can do to keep things ordered. The most basic of these are categories.
A brand new Discord server already has two default categories, and that's where we’ve put our new voice and text channels. To make another category inside a Discord server, right-click inside an open area in the left-hand tree and click “Create Catagory.” Leave the privacy option unchecked, name the categories, and then hit "create."
Users can now drag and drop the "gameplay" and "esports" channels into their own categories.

That wraps up WIN.gg's beginner "How to set up your own Discord server," but that doesn't mean there isn't more to learn. Discord recently added the ability for players to stream games and even entire windows from the chat program, so check out the full guide on how anyone can stream on Discord and skip the hard parts.